2017年5月18日星期四

iTunes can not connect this iphone, problem

Reset iTunes Lockdown Certificates in Mac OS X and Windows


Step #1. Very first thing you'll need to do is to quit iTunes and remove any iOS devices attached to your Mac or Windows PC.
Step #2. Now go to the Lockdown directory from the location discussed above depending on your device and OS.
Step #3. Select all the files in the Lockdown folder and delete them. This step might require you to enter your administrator password depending on the privileges you have set.
Step #4.  
sudo chmod go+w  /private/var/db/lockdown or chmod 777 of the lockdown dir.  
This changes the folder so that group (g) and other (o) have write access.
That's it; the certificates have been reset and you'll need to trust the computer once again when you connect an iOS device with iTunes. We have already mentioned earlier, but we would like to warn again to not mess with these files unless and until it is required.
Locate Lockdown folder on Mac
The Lockdown folder on Mac is located at:
/private/var/db/lockdown/
Lockdown folder in Windows XP
C:\Documents and Settings\All Users\Application Data\Apple\Lockdown
Lockdown folder in Windows Vista
C:\Users\USERNAME\AppData\roaming\Apple Computer\Lockdown
Lockdown folder in Windows 7, Windows 8, and Windows 10
C:\ProgramData\Apple\Lockdown
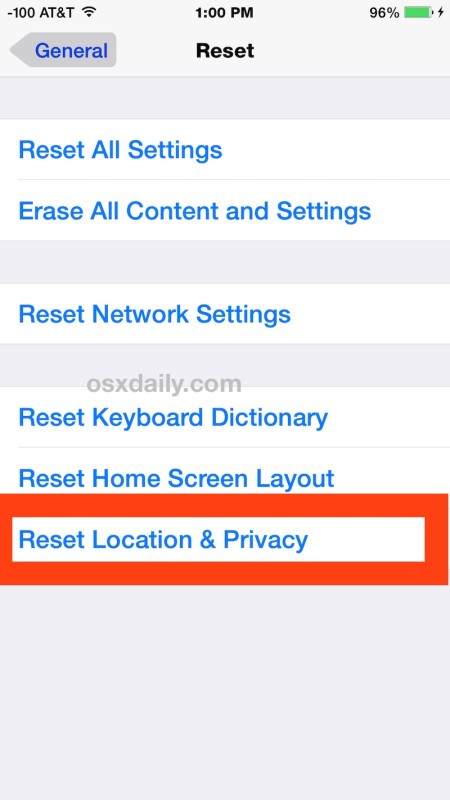
How to ‘UnTrust’ All Computers from iPhone & iPad

How to Reset the “Trust This Computer” Alert and UnTrust All Computers from iOS

This resets all trusted computers from any iPhone, iPad, or iPod touch running iOS 8 or later:
  1. Open the Settings app on the iPhone, iPad, or iPod touch
  2. Go to “General” then to “Reset”
  3. Tap on “Reset Location & Privacy”, enter the devices passcode, and confirm that you wish to reset all location and privacy settings on the iOS device
  4. Exit out of Settings when complete (perhaps after you reconfigure the location and privacy customizations you had prior to the reset)


How to Reset iTunes Lockdown Certificates in Mac OS X and Windows

How to Reset iTunes Lockdown Certificates in Mac OS X and Windows

Step #1. Very first thing you'll need to do is to quit iTunes and remove any iOS devices attached to your Mac or Windows PC.
Step #2. Now go to the Lockdown directory from the location discussed above depending on your device and OS.
Step #3. Select all the files in the Lockdown folder and delete them. This step might require you to enter your administrator password depending on the privileges you have set.
That's it; the certificates have been reset and you'll need to trust the computer once again when you connect an iOS device with iTunes. We have already mentioned earlier, but we would like to warn again to not mess with these files unless and until it is required.

Locate Lockdown folder on Mac
The Lockdown folder on Mac is located at:
/private/var/db/lockdown/
Lockdown folder in Windows XP
C:\Documents and Settings\All Users\Application Data\Apple\Lockdown
Lockdown folder in Windows Vista
C:\Users\USERNAME\AppData\roaming\Apple Computer\Lockdown
Lockdown folder in Windows 7, Windows 8, and Windows 10
C:\ProgramData\Apple\Lockdown

2016年12月17日星期六

[How to check iPhone or iPad battery cycles and real capacity] 查看iPhone和iPad电池充电次数和电池容量

首先需要打开诊断:
设置-隐私-诊断与用量-勾选“自动发送”
之后可能需要一天的时间来更新生成诊断日志。
随后在“诊断与用量数据(diagnostics and usage data)”当中找到最新的以“log-aggregated-2016-***”开头的文件。

这里面的com.apple.ioreport.BatteryCycleCount下面的数字就是电池充电次数。

而com.apple.snapshot.battery.maxCapacity下面数字就是电池实际容量。

文件内容很长,需要仔细找,但基本是按照字母顺序排列的。

2015年9月24日星期四

从香港购买iMac并托运回来的经历

      8月底去香港参加一个会议。考虑到物价便宜,计划买一台苹果电脑回来。

      一开始一直在纠结到底买mac mini还是iMac,一个是价格因素,另一个是怎么带回来的问题。

      mac mini便宜、性能上足够家用,看网页视频、处理文档等,但是需要自己配显示器键盘鼠标,其实再配一个大一点、质量好一点的显示器,算下来价格和iMac差不多了。

      iMac很漂亮,让人流口水,但是价格不低,而且最重要的,坐航班怎么弄回来。google很久,大家有说直接带上飞机的,也有托运的,例子不多,有的人托运最后把屏幕弄碎了,有的说直接带上飞机可能不让带。mac mini没有这个问题,体积小,直接装背包里就行了。

      在入住酒店后,发现酒店大厅就有两台iMac,第二天起了个大早跑去大厅体验,才发现27寸iMac的屏幕真的是很大,眼睛根本看不过来全屏幕,但是体验确实很好。所以最终决定买iMac,但是买21寸的,并仔细包装、以托运的方式带回国。

      在苹果官网上做了功课,21.5寸iMac中配,国行9688人民币,港行9888港币,折算回来合人民币8142块,便宜了1500+。正好还有一个高中同学在港读书,用学生优惠还可以再便宜约300+,而且正处暑假,苹果作活动,还送一个价值1000+港币的Beats solo2耳机。

      又一城苹果店买到手后,在店里打开看了一下没有问题,拖回了酒店。把里面的包装仔细看了一下,发现成型泡沫只在屏幕的四周进行保护,屏幕中间大片区域是没有泡沫保护的,如果有硬物戳到了包装壳上这个区域,很有可能会把屏幕碰碎。这个区域离表面的包装盒厚度不大,酒店里正好提供一次性拖鞋,软度厚度都合适,就拿了3双填在了这个区域里面,然后又塞进去n多衣服做缓冲才放心。

      在机场有打包的服务,走之前在网上查了价格,泡泡纸+包纸+捆绑也不过150港币,结果到了机场才发现要花310港币,主要是泡泡纸用了大概有10米多,然后用包装箱包起来,最后五花大绑捆绑起来。拖到行李托运没有超重。最后还是不太放心,于是让工作人员在箱子上下左右前后都贴满了易碎签。
     
      坐的航班是直飞成都的,晚上到了机场,办完入境,取了行李,最后过成都海关时,发现必须要过安检。心想完了,要被查税了。没办法,只能把大包小包行李箱和imac的大箱子一股脑过了安检,过去之后一个工作人员拉住问这个大箱子里面是什么,我顿时紧张起来,但故作镇定的说是显示器,那时候过关的人很多,只有两台安检机,那人估计也顾不过来了,嘟囔了句“这么大显示器。。。”也就没理我了,算是顺利过关吧。
   
      从机场出来打车到酒店后第一件事就是拆开检查,还好一点问题都没有。算是大功告成。

      回来看到新闻说中国海关从9月1日起进一步收紧了政策:100%疑问箱开箱查验,100%领队查验,100%团体游客查验!自用超过5000元开始征税!心想真是幸运,如果9.1日后被问到的话,肯定要开包检查,就免不了交上千块的税了。

      买的时候还有个小插曲,先去了ifc的苹果旗舰店问店员可不可以拿别人的学生证买,那人说没问题。结果第二天拿了同学的学生证,跑去又一城的苹果店买的时候,连续问了两个店员都说不可以,必须学生证本人到场。只好又把我同学叫来才行。跟我同行的LJ买了iPad air,学生价也有100+地优惠。

       最后要感谢一下YQ童鞋,先借给我们手机充电线用,还借学生证给我们买苹果电脑。

2015年3月9日星期一

利用AWS科学上网

Amazon AWS给予新申请帐号一年的免费试用期,
免费月流量额度足够科学上网。

一、申请amazon AWS账号
二、创建云主机(推荐ubuntu 14)
三、通过命令行安装并配置shadowsocks


一、申请AWS账号
参考下面网页教程,虽然比较老,但是大致流程是一样的。
http://blog.csdn.net/awschina/article/details/17149515


二、创建云主机
参考网页教程
http://sunny-play.com/2012/03/get-started-with-ec2/
http://blog.csdn.net/williamvalentine/article/details/17306895

注意以下几点:
1、Region推荐Tokyo,国内连接速度较快(update2016-09:US West (N. California)还是快一些
2、虚拟机要选带星号的,属于免费套餐。推荐ubuntu14
3、保存好下载的.pem文件,以后连接虚拟机就靠这个文件了。
4、创建后,注意检查Network & Security下面的Security Groups,将Inbound和Outbound配置都改为:All traffic, All, All, 0.0.0.0/0
5、可以为虚拟机分配一个静态IP,在Network & Security下面的Elastic IPs,创建后Associate到新建的虚拟机上。

三、安装并配置shadowsocks
需要用到的工具:linux或mac的命令行工具
windows需要使用putty


shandowsocks有许多版本,最早为python,后来发展出了各种编程语言版本。
目前推荐的是libev版本,纯C语言编写,内存控制优秀,运行稳定,低端服务器也有很好的表现.

开发页面
https://github.com/shadowsocks/shadowsocks-libev

安装方法:
Debian & Ubuntu
编辑 /etc/apt/sources.list文件,
添加如下两行,shadowsocks的源
# Debian Wheezy, Ubuntu 12.04 or any distribution with libssl > 1.0.1
deb http://shadowsocks.org/debian wheezy main


然后安装shadowsocks
sudo apt-get update
sudo apt-get install shadowsocks-libev


创建配置文件:
sudo mkdir /etc/shadowsocks
cd /etc/shadowsocks
sudo vim shadowsocksMyConfig.json

内容如下(主要配置三项:服务器端口、密码及加密方式,推荐aes-256-cfb)
{
    "server":"0.0.0.0",
    "server_port":1080,
    "password":"mypassword",
    "timeout":100,
    "method":"aes-256-cfb",
}


启动shadowsocks
sudo ss-server -c /etc/shadowsocks/shadowsocksMyConfig.json
至此,shadowsocks已配置完毕,可以使用了。


可以使用supervisor工具让shadowsocks在后台运行,
不必手动启动shadowsocks服务,而且进程出错以后会自动重启shadowsocks服务。

首先安装supervisor
sudo apt-get install supervisor

然后创建supervisor对shadowsocks的配置文件
cd /etc/supervisor/conf.d/
sudo vi shadowsocks.conf

配置文件内容
[program:shadowsocks]
command=ss-server -c /etc/shadowsocks/shadowsocksMyConfig.json
autorestart=true
user=nobody

若需要shadowsocks以小于1024的端口启动,上述最后一行必须使用user=root

下面运行supervisor,
sudo service supervisor start
sudo supervisorctl reload
如果第一条命令不能执行可尝试将服务名由supervisor改为supervisord。

如果需要查看运行状态和log文件可以使用如下的命令
sudo supervisorctl status
sudo supervisorctl tail -f shadowsocks stderr


其它就是一些虚拟主机的优化了
AWS虚拟机时间长了内存占用就高了,
可以配置crontab定时重启,具体方法网上很多。
(update201609:推荐的一个优化是升级到3.5以上内核,可将速度从500K/s提高到1500K/s)


2014年12月27日星期六

Openwrt配置:自动多拨脚本及杂项

本文的目的是说明使用脚本实现
  1. 自动多拨
  2. 多拨完成后关闭未连接的pppoe端口(防止自动重复拨号,耗费CPU资源)
  3. 重设mwan3的https连接

系统: CHAOS CALMER (Bleeding Edge, r42871)
前提条件:
  1. 设置好了多个wan(wan1, wan2, wan3, wan4, ...,我这里是7个),并可以多拨;
  2. 安装了mwan3,并已配置好防火墙等(可参考下面的mwan3配置文件);

使用crontab定时运行多拨脚本;

这里采用的多拨方法是network restart,然后检查拨号成功的数目,当到达所需的多拨个数时停止;
我这里一般7个wan可以播出2-3个,运气好能有5个;

一共用了3个脚本
  1. MultiDialPPPOE.sh:用于多拨,接受1个参数,就是想要达到的多拨数目;
  2. CloseDeadLink.sh:用于多拨完成后关闭未拨号成功的wan,这样防止这些wan自动重拨,占用CPU资源
  3. SetHTTPS4mwan3.sh:用于重设mwan3的443端口的策略,保证https连接可用(对于网银等很重要);

为了重设mwan3的https配置,使用了两个临时文件来重新组合成mwan3的配置文件:mwan3.part1和mwan3.part2

定时运行多拨(每天早上3:20拨号,其中MultiDialPPPOE.sh 3即表示需要达到的多拨数目,达到3个或以上拨号后就停止)
root@OpenWrtZZH:/etc/crontabs# cat /etc/crontabs/root
20 03 * * * sh /home/MultiDialShell/MultiDialPPPOE.sh 3 >> /home/MultiDialShell/PPPOE_MultiDial.log

下面是 MultiDialPPPOE.sh内容:

root@OpenWrtZZH:/home/MultiDialShell# cat MultiDialPPPOE.sh
#!/bin/sh
echo "**************************************************************"
echo "`date +%Y%m%d-%H%M%S`"
# NUMBER OF PPPOE LINKS
if [ "$1" = "" ]
then
    NumOfLinkRequired=1
else
    NumOfLinkRequired=$1
fi

# GET ACTUAL PPPOE LINK NUMBER.
ActualLinkNum=`ifconfig | grep 'pppoe-wan' | wc -l`

while [ $ActualLinkNum -lt $NumOfLinkRequired ]
do
    echo "        $ActualLinkNum(Actual) of $NumOfLinkRequired(required) links"
    echo "        trying to restart network..."
    echo "        COMMAND: /etc/init.d/network restart"
    /etc/init.d/network restart
    sleep 5
   
    ActualLinkNum=`ifconfig | grep 'pppoe-wan' | wc -l`
done

echo "    $ActualLinkNum(Actual) / $NumOfLinkRequired(Required) links!"

sleep 1
echo "    Closing Dead Links..."
sh ./CloseDeadLink.sh
sleep 1
echo "    Resetting HTTPS links for mwan3..."
sh ./SetHTTPS4mwan3.sh
echo "Dial Proc Done! "

echo "**************************************************************"
下面是 CloseDeadLink.sh内容:
root@OpenWrtZZH:/home/MultiDialShell# cat CloseDeadLink.sh
#!/bin/sh
# close the dead link of wan*

TempValue=1

for k in $( seq 1 7 )
do
    string=pppoe-wan$k
    wanstatus=`ifconfig | grep $string | wc -l`
    if [ $wanstatus -ne $TempValue ]
        then
        ifdown wan$k
        echo "        wan$k stopped"
    else
        echo "        wan$k active"
    fi
下面是 SetHTTPS4mwan3.sh内容:
root@OpenWrtZZH:/home/MultiDialShell# cat SetHTTPS4mwan3.sh
#!/bin/sh
# close the dead link of wan*

TempValue=1
# wan1 PPPOE status check

for k in $( seq 1 7 )
do
    string=pppoe-wan$k
    echo "        checking wan$k"
    wanstatus=`ifconfig | grep $string | wc -l`
    if [ $wanstatus -eq $TempValue ]
        then
        echo "" > mwan3.test
        str1=w${k}_only
        str2="'"
        str3="option use_policy "
        str4=${str3}${str2}${str1}${str2}
       
        cat mwan3.part1 > mwan3.test
        echo $str4 >> mwan3.test
        cat mwan3.part2 >> mwan3.test
        echo "        wan${k} is active"
        echo "        Setting wan${k} as https port..."
        break
    fi
done
cp mwan3.test /etc/config/mwan3
sleep 1
mwan3 restart
下面是完整的mwan3内容(/etc/config下面)
root@OpenWrtZZH:/home/MultiDialShell# cat mwan3.bk20141228

config interface 'wan1'
    option enabled '1'
    option reliability '2'
    option count '1'
    option timeout '3'
    option interval '8'
    option down '8'
    option up '8'
    option reroute '1'

config interface 'wan2'
    option enabled '1'
    option reliability '2'
    option count '1'
    option timeout '3'
    option interval '8'
    option down '8'
    option up '8'
    option reroute '1'

config interface 'wan3'
    option enabled '1'
    option reliability '2'
    option count '1'
    option timeout '3'
    option interval '8'
    option down '8'
    option up '8'
    option reroute '1'

config interface 'wan4'
    option enabled '1'
    option reliability '2'
    option count '1'
    option timeout '3'
    option interval '8'
    option down '8'
    option up '8'
    option reroute '1'

config interface 'wan5'
    option enabled '1'
    option reliability '2'
    option count '1'
    option timeout '3'
    option interval '8'
    option down '8'
    option up '8'
    option reroute '1'

config interface 'wan6'
    option enabled '1'
    option reliability '2'
    option count '1'
    option timeout '3'
    option interval '8'
    option down '8'
    option up '8'
    option reroute '1'

config interface 'wan7'
    option enabled '1'
    option reliability '2'
    option count '1'
    option timeout '3'
    option interval '8'
    option down '8'
    option up '8'
    option reroute '1'


config member 'w1_m1_w1'
    option interface 'wan1'
    option metric '1'
    option weight '1'

config member 'w2_m1_w1'
    option interface 'wan2'
    option metric '1'
    option weight '1'

config member 'w3_m1_w1'
    option interface 'wan3'
    option metric '1'
    option weight '1'

config member 'w4_m1_w1'
    option interface 'wan4'
    option metric '1'
    option weight '1'

config member 'w5_m1_w1'
    option interface 'wan5'
    option metric '1'
    option weight '1'

config member 'w6_m1_w1'
    option interface 'wan6'
    option metric '1'
    option weight '1'

config member 'w7_m1_w1'
    option interface 'wan7'
    option metric '1'
    option weight '1'


config policy 'w1_only'
    list use_member 'w1_m1_w1'

config policy 'w2_only'
    list use_member 'w2_m1_w1'

config policy 'w3_only'
    list use_member 'w3_m1_w1'

config policy 'w4_only'
    list use_member 'w4_m1_w1'

config policy 'w5_only'
    list use_member 'w5_m1_w1'

config policy 'w6_only'
    list use_member 'w6_m1_w1'

config policy 'w7_only'
    list use_member 'w7_m1_w1'


config policy 'wan_s_balanced'
    list use_member 'w1_m1_w1'
    list use_member 'w2_m1_w1'
    list use_member 'w3_m1_w1'
    list use_member 'w4_m1_w1'
    list use_member 'w5_m1_w1'
    list use_member 'w6_m1_w1'
    list use_member 'w7_m1_w1'


config rule 'rule_https'
    option dest_port '443'
    option proto 'tcp'
    option use_policy 'w2_only'

config rule 'rule_all'
    option use_policy 'wan_s_balanced'
    option proto 'all'